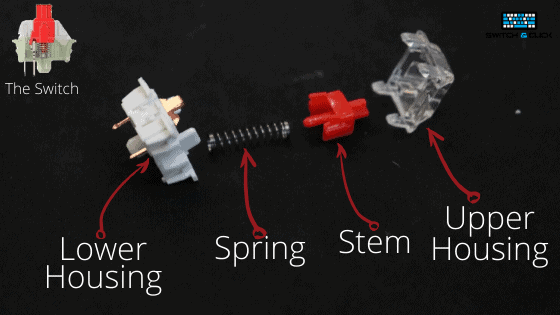
To fix keyboard spring ping noise, consider applying lubricant to the springs or replacing them with quieter options. Adjusting keycap height may also reduce noise.
A noisy keyboard can be distracting, especially during intense gaming sessions or long work hours. The spring ping noise often arises from mechanical keyboards, where the springs inside the switches create unwanted sounds. This issue can detract from your typing experience and lead to frustration.
Fortunately, several effective solutions exist to minimize or eliminate this noise. Whether you’re a gamer, a writer, or just someone who values a peaceful workspace, addressing keyboard noise can enhance your overall enjoyment and productivity. Discover simple techniques to enjoy a quieter, more pleasant typing experience.
Identifying Keyboard Spring Ping
Spring ping noise can be annoying. It distracts from your typing experience. Understanding how to identify this noise is key to fixing it. This section covers signs of spring ping and common causes.
Signs Of Spring Ping
- High-pitched noise: A sharp sound occurs after key presses.
- Delayed echo: Sound lingers after the key is released.
- Uneven typing sounds: Some keys produce different noises.
- Inconsistent key feel: Some keys feel different than others.
Common Causes
| Cause | Description |
|---|---|
| Worn springs | Old springs lose tension and create noise. |
| Loose components | Parts may vibrate and produce sounds during typing. |
| Improper lubrication | Poor lubrication can lead to friction and noise. |
| Keyboard design | Some designs are prone to spring ping sounds. |
Tools And Materials Needed
Fixing the keyboard spring ping noise requires specific tools and materials. Having the right items ensures a smooth repair process. Below is a list of essential tools and lubricants needed for this task.
Basic Toolkit
A basic toolkit is essential for any keyboard repair. Here are the necessary tools:
- Philips screwdriver – For removing screws.
- Flathead screwdriver – For prying open the keyboard.
- Tweezers – For handling small parts.
- Keycap puller – For safely removing keycaps.
- Brush – For cleaning dust and debris.
Lubricants And Greases
Choosing the right lubricants is crucial for reducing noise. Here are some recommended options:
| Type | Description |
|---|---|
| Silicone grease | Good for plastic parts, prevents sticking. |
| White lithium grease | Ideal for metal parts, offers long-lasting lubrication. |
| Dielectric grease | Protects electrical connections, reduces noise. |
Gather these tools and materials before starting your keyboard repair. Proper preparation ensures an effective solution to the annoying spring ping noise.
Preparation Steps Before Fixing
 Before tackling the keyboard spring ping noise, proper preparation is key. This ensures a smooth and efficient repair process. Follow these steps to set yourself up for success.
Workspace Setup
Creating a well-organized workspace is crucial. A tidy area helps prevent losing small parts. Here’s how to set it up:
- Choose a flat, clean surface.
- Use good lighting for visibility.
- Gather necessary tools:
- Screwdriver set
- Plastic prying tool
- Compressed air can
- Lubricant for springs
- Keep a container for screws and small parts.
- Wear anti-static wristband to avoid damage.
Keyboard Disassembly
Disassembling your keyboard correctly is vital. Follow these steps to avoid damaging any components:
- Unplug the keyboard from your computer.
- Carefully remove keycaps using a keycap puller.
- Locate and remove screws on the back panel.
- Use a plastic prying tool to separate the keyboard casing.
- Gently lift the circuit board to access springs.
Keep track of all parts during disassembly. This will help during reassembly.
Lubrication Techniques
Fixing keyboard spring ping noise often requires proper lubrication. The right lubricant can reduce noise and improve performance. Follow these techniques to achieve a quieter keyboard experience.
Choosing The Right Lubricant
Selecting the correct lubricant is crucial. Here are some popular options:
- Grease: Thick and long-lasting. Ideal for springs.
- Oil: Thinner consistency. Best for moving parts.
- Silicone Lubricant: Versatile and moisture-resistant.
Consider the following factors:
| Type | Pros | Cons |
|---|---|---|
| Grease | Lasts long, reduces noise | Can be messy, harder to apply |
| Oil | Easy to apply, less messy | Wears off faster |
| Silicone | Moisture-resistant, versatile | Can attract dust |
Application Methods
Proper application ensures effective lubrication. Follow these steps:
- Disassemble the keyboard carefully.
- Clean the springs and switches thoroughly.
- Choose the lubricant type for your needs.
- Apply a small amount of lubricant:
- For grease, use a small brush or toothpick.
- For oil, use a dropper or needle applicator.
- For silicone, spray lightly or use a brush.
- Reassemble the keyboard and test.
Always use a light hand. Too much lubricant can cause issues. Test the keyboard after each application.
Spring Modification Methods
Spring modification methods can greatly reduce the annoying ping noise from your keyboard. These techniques focus on altering or replacing the springs in your keyboard switches. Below are two popular methods: heat treatment and spring swapping.
Heat Treatment
Heat treatment can soften springs and reduce noise. Follow these steps:
- Gather necessary tools: a heat source and a metal container.
- Remove the springs from the keyboard switches.
- Place the springs in the metal container.
- Heat the container at a controlled temperature (around 200°C or 392°F).
- Keep the springs in the heat for about 15-20 minutes.
- Allow the springs to cool slowly at room temperature.
Caution: Avoid overheating. This may damage the springs. Test the springs after treatment to check for noise reduction.
Spring Swapping
Spring swapping involves replacing existing springs with different ones. This method can lead to a quieter keyboard. Consider these points:
- Choose springs with lower tension for less noise.
- Opt for materials like silicone or rubber to dampen sound.
- Research compatible springs for your keyboard model.
Here’s a simple table to compare spring types:
| Spring Type | Tension Level | Noise Level |
|---|---|---|
| Original Spring | High | High |
| Soft Spring | Low | Low |
| Rubber Dampened | Medium | Very Low |
Try out different springs to find the best fit. Enjoy a quieter typing experience!
Dampening Solutions
 Dampening solutions help reduce annoying keyboard spring ping noise. These methods make typing quieter and improve your overall experience. Here are some effective techniques to try.
Installing O-rings
O-rings are small rubber rings that fit around keycaps. They absorb noise and soften key presses. Follow these steps to install O-rings:
- Purchase the right size O-rings for your keyboard.
- Remove the keycaps using a keycap puller.
- Place an O-ring on each keycap stem.
- Reattach the keycaps carefully.
Benefits of using O-rings:
- Reduces noise significantly.
- Improves typing comfort.
- Easy to install and remove.
Foam Pads And Silencing Clips
Foam pads and silencing clips provide extra dampening. They fill space between the keyboard plate and switches. Here’s how to use them:
- Choose a foam pad suitable for your keyboard.
- Remove the keyboard case screws.
- Place the foam pad inside the case.
- Reassemble the keyboard carefully.
Benefits of foam pads and silencing clips:
- Minimizes vibrations and noise.
- Enhances keyboard feel and sound.
- Can be customized for different keyboards.
Reassembling The Keyboard
Reassembling your keyboard is crucial after fixing the spring ping noise. Proper assembly ensures that all components work smoothly. Follow the steps carefully to avoid any issues.
Step-by-step Guide
- Gather Tools:
- Small screwdriver
- Keycap puller
- Compressed air
- Soft cloth
- Position the Base:
Place the keyboard base on a flat surface. Ensure it’s clean and free of dust.
- Install the Switches:
Carefully insert the switches back into their slots. Make sure they click in place.
- Attach the Stabilizers:
Fix the stabilizers to larger keys like Enter and Space. Check that they move freely.
- Replace the Keycaps:
Align each keycap with its switch. Press down firmly until they snap into place.
- Secure the Top Case:
Align the top case with the base. Screw it back together using the small screwdriver.
Testing For Success
Testing your keyboard ensures everything works as intended. Follow these steps:
- Power On: Turn on your computer and connect the keyboard.
- Check Each Key:
Press every key to see if it registers. Listen for any pinging sounds.
- Test Typing:
Open a text editor. Type out sentences to test the keyboard’s responsiveness.
- Inspect Stabilizers:
Press the larger keys. Ensure they feel stable and do not rattle.
- Final Check: Listen for any unexpected noises. Reopen if necessary.
Your keyboard should now be free of spring ping noise. Enjoy typing without distractions!
Preventative Measures For Future
Preventing keyboard spring ping noise is easier than fixing it. Simple maintenance and careful selection can help you avoid this issue.
Routine Maintenance Tips
Regular upkeep keeps your keyboard in top shape. Here are some essential tips:
- Clean your keyboard regularly. Dust and debris can cause noise.
- Check keycaps for tightness. Loose keycaps can create sound.
- Use compressed air to remove dust. It helps maintain smooth operation.
- Lubricate springs lightly. Use keyboard-safe lubricant.
Follow these steps to keep your keyboard quiet:
- Unplug the keyboard.
- Remove keycaps carefully.
- Clean the surface.
- Apply lubricant on springs.
- Reattach keycaps securely.
Choosing The Right Keyboard
Selecting the right keyboard prevents annoying noises. Consider the following factors:
| Type of Keyboard | Noise Level | Spring Mechanism |
|---|---|---|
| Mechanical | Can be noisy | Varies by switch type |
| Membrane | Generally quiet | Soft and silent |
| Rubber Dome | Moderate noise | Soft touch |
Choose a keyboard that matches your needs:
- For quiet typing: opt for membrane keyboards.
- For tactile feedback: choose specific mechanical switches.
- Test before buying: listen for noise levels.
Frequently Asked Questions
How Can I Reduce Keyboard Spring Ping Noise?
To reduce keyboard spring ping noise, consider using dampening rings. These rings absorb sound and minimize vibrations. Additionally, lubricating the springs can also help. Apply a suitable lubricant carefully to avoid excess. Regular maintenance, including cleaning, can further enhance performance and reduce noise.
What Causes Keyboard Spring Ping Noise?
Keyboard spring ping noise is usually caused by vibrations. When keys are pressed, springs compress and decompress, creating sound. Poor quality springs can exacerbate this issue. Dust and debris can also contribute to noise. Understanding these factors can help you address the problem effectively.
Is It Safe To Lubricate Keyboard Springs?
Yes, it is safe to lubricate keyboard springs when done correctly. Use a lubricant specifically designed for mechanical keyboards. Apply it sparingly to avoid unwanted buildup. Proper lubrication can reduce noise and improve key feel. Always ensure the keyboard is clean before applying lubricant.
Can I Fix Keyboard Noise Without Opening It?
Yes, you can fix keyboard noise without opening it. Consider using sound-dampening mats under the keyboard. You can also try typing more gently to reduce impact noise. Additionally, investing in a quieter keyboard model can help. These solutions can minimize noise without the need for disassembly.
Conclusion
Fixing keyboard spring ping noise can enhance your typing experience significantly. By following the steps outlined in this guide, you can eliminate those annoying sounds. Regular maintenance and the right tools make a big difference. Enjoy a quieter workspace and improved focus with a little effort on your keyboard care.


