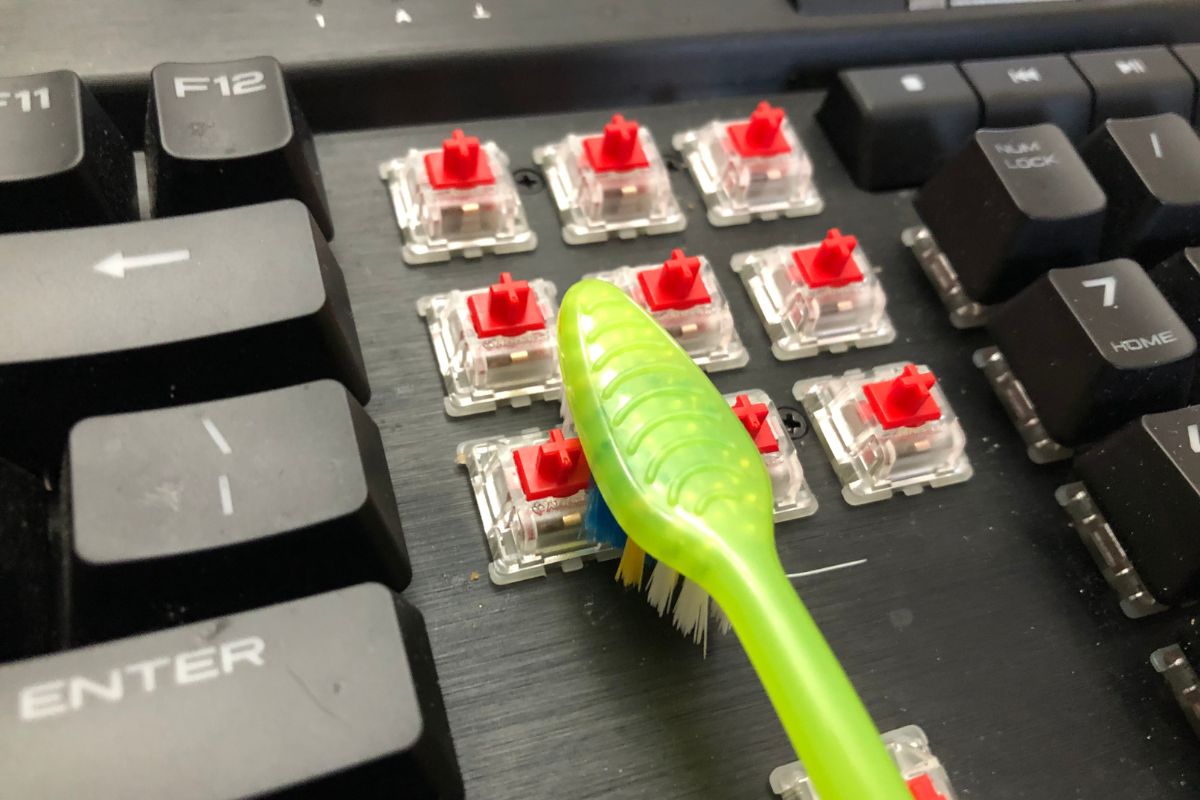
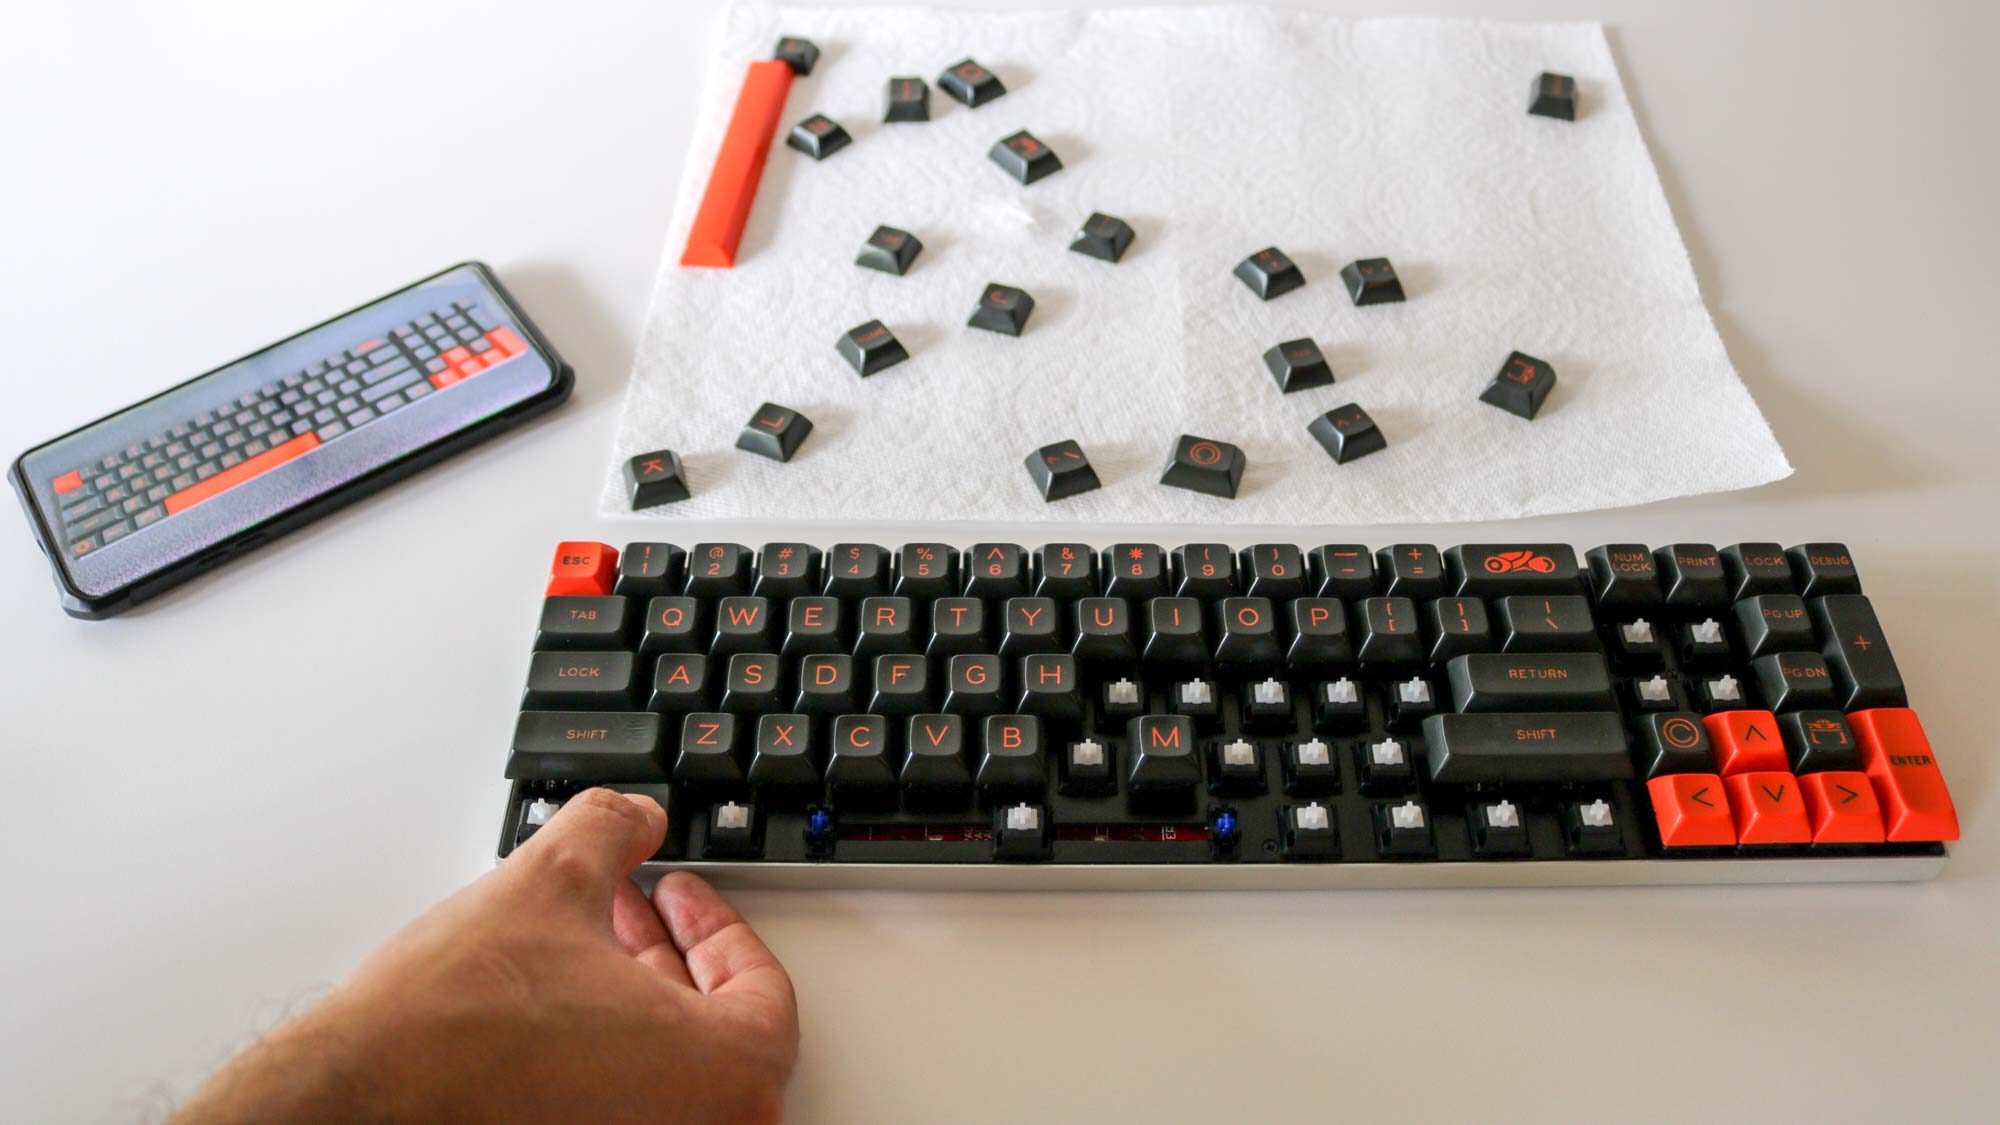
To clean a mechanical keyboard, first, unplug it and remove the keycaps using a keycap puller. Next, wipe the surface with a microfiber cloth and clean the keycaps separately with soap and water.
A clean mechanical keyboard enhances performance and extends its lifespan. Over time, dust, crumbs, and oils from your fingers accumulate between the keys, leading to sticky or unresponsive keys. Regular cleaning not only improves aesthetics but also boosts your typing experience.
Many users underestimate the importance of maintenance, thinking it’s a hassle. In reality, a few simple steps can keep your keyboard looking and functioning like new. Whether you’re a gamer or a professional typist, knowing how to clean your keyboard effectively is crucial for optimal performance. Let’s explore the best methods to maintain your mechanical keyboard.
Mechanical keyboards are popular among gamers and typists. They offer tactile feedback and durability. Each key has its own switch, providing a unique feel. Cleaning these keyboards is essential for optimal performance.
Dirt and grime can affect the keys and switches. Regular maintenance enhances their lifespan. A clean keyboard ensures a better typing experience.
Why Cleanliness Matters
Keeping your mechanical keyboard clean is important. Here are a few reasons why:
- Health: Dirt and germs can accumulate on keys.
- Performance: Dust can interfere with key functions.
- Longevity: Regular cleaning prevents wear and tear.
- Aesthetics: A clean keyboard looks better on your desk.
Common Issues With Dirty Keyboards
Dirty keyboards can cause several problems. Some common issues include:
| Issue | Description |
|---|---|
| Sticky Keys | Dirt can cause keys to stick or not respond. |
| Unresponsive Keys | Dust may block key mechanisms, leading to failures. |
| Discoloration | Grime can stain keycaps, making them look old. |
| Reduced Lifespan | Neglect can shorten the keyboard’s overall life. |
Cleaning your mechanical keyboard prevents these issues. Regular upkeep keeps it functioning well.
Preparation For Cleaning
 Cleaning a mechanical keyboard requires careful preparation. You need the right tools and a safe environment. Proper preparation prevents damage and ensures effective cleaning.
Tools You’ll Need
- Keycap puller: Removes keycaps easily.
- Soft brush: Clears dust and debris.
- Microfiber cloth: Wipes down surfaces without scratching.
- Isopropyl alcohol: Disinfects and cleans stubborn stains.
- Compressed air can: Blows out dirt from hard-to-reach areas.
Safety First: Unplugging Your Keyboard
Always unplug your keyboard before cleaning. This prevents accidental key presses.
For wireless keyboards, remove the batteries. This keeps your device safe from power surges.
Follow these steps:
- Locate the USB cable or wireless receiver.
- Carefully disconnect it from the computer.
- If applicable, remove the batteries.
Taking these safety measures protects both you and your keyboard.
The Cleaning Process
Cleaning your mechanical keyboard keeps it in top shape. A clean keyboard improves performance and lifespan. Follow these steps for a thorough clean.
Removing Keycaps
Start by removing the keycaps. This allows easy access to dirt and grime. Here’s how:
- Turn off your keyboard.
- Use a keycap puller tool. Press down gently.
- Pull the keycap straight up. Avoid twisting.
- Place the removed keycaps in a bowl.
Be careful with larger keys. They may have stabilizers. Check for clips before removal.
Dusting And Blowing Out Debris
Next, dust and blow out debris from the keyboard. Use the following tools:
- Compressed air canister
- Soft brush or cloth
Follow these steps:
- Hold the keyboard upside down.
- Use compressed air to blow out dust. Aim between switches.
- Wipe the surface with a damp cloth.
- Use a soft brush for stubborn crumbs.
This method removes hidden debris. Your keyboard will feel fresh again.
Deep Cleaning Techniques
 Keeping your mechanical keyboard clean boosts performance and lifespan. Deep cleaning techniques help remove dirt, grime, and stubborn stains. These methods ensure your keyboard looks and feels great.
Using Cleaning Solutions
Select the right cleaning solution for your keyboard. Avoid harsh chemicals that can damage the keys. Here are some effective options:
- Isopropyl Alcohol: A safe choice for disinfecting.
- Distilled Water: Ideal for a gentle clean.
- Keyboard Cleaner: Specially designed for electronics.
Mix a solution of your choice in a small bowl. Dampen a microfiber cloth with the solution. Wipe down the keyboard gently. Ensure no liquid drips into the switches.
Tackling Stubborn Stains
Some stains require extra attention. Follow these steps to remove tough marks:
- Identify the stain type.
- Use a soft-bristle brush for dirt.
- Apply a small amount of cleaning solution.
- Scrub gently in circular motions.
- Wipe with a clean, dry cloth.
For sticky residues, try this:
| Stain Type | Cleaning Method |
|---|---|
| Food Crumbs | Shake keyboard upside down. |
| Oil Marks | Use isopropyl alcohol with a cloth. |
| Ink Stains | Apply distilled water and scrub gently. |
Regular deep cleaning keeps your keyboard fresh. Follow these techniques for the best results.
Keycap Care
Keycap care is essential for a clean mechanical keyboard. Proper maintenance keeps your keyboard looking great and functioning well. It also enhances your typing experience. Let’s explore how to clean your keycaps effectively.
Cleaning Keycaps
Cleaning keycaps is simple. Follow these steps for the best results:
- Remove the Keycaps: Use a keycap puller to gently pop them off.
- Prepare a Cleaning Solution: Mix warm water with a few drops of mild soap.
- Soak Keycaps: Place the keycaps in the solution for about 10-15 minutes.
- Scrub Gently: Use a soft brush to scrub away dirt and grime.
- Rinse Thoroughly: Rinse keycaps under warm water to remove soap.
For stubborn stains, try a mixture of baking soda and water. Avoid harsh chemicals. They can damage the keycaps.
Drying And Reattaching Keycaps
Drying keycaps is as important as cleaning them. Follow these tips:
- Pat Dry: Use a soft cloth to pat keycaps dry.
- Air Dry: Let keycaps air dry for at least an hour.
- Check for Moisture: Ensure no water remains in keycap crevices.
Reattaching keycaps is easy:
- Align the Keycap: Position it correctly over the switch.
- Press Down Firmly: Apply pressure until it clicks into place.
- Test Functionality: Press each key to ensure it works.
Proper keycap care keeps your mechanical keyboard clean. It also helps maintain its functionality and extends its life.
Maintaining Your Keyboard Post-cleaning
Cleaning your mechanical keyboard is essential. Maintaining it afterward keeps it in top shape. A few simple steps can prolong its life and performance.
Regular Cleaning Schedule
Establish a cleaning routine for your keyboard. Regular maintenance prevents dirt buildup. Follow this simple schedule:
| Frequency | Task |
|---|---|
| Weekly | Wipe the keys with a microfiber cloth. |
| Monthly | Remove keycaps and clean with a soft brush. |
| Quarterly | Deep clean by soaking keycaps in soapy water. |
This routine keeps your keyboard looking new. Adjust the schedule based on usage. More frequent cleaning may be necessary for heavy use.
Avoiding Common Mistakes
Be aware of common mistakes that can damage your keyboard.
- Using the wrong cleaning products: Avoid harsh chemicals.
- Soaking the keyboard: Never submerge it in water.
- Forgetting to unplug: Always disconnect before cleaning.
Follow these tips to maintain your keyboard. Proper care helps avoid costly repairs. Treat your keyboard well for a long-lasting performance.
Advanced Tips For Keyboard Enthusiasts
 For keyboard enthusiasts, cleaning goes beyond the basics. Advanced techniques enhance performance and longevity. Here are some expert tips to elevate your keyboard care routine.
Lubrication For Smoother Typing
Lubrication can make a significant difference in your typing experience.
- Choose the Right Lubricant: Use a high-quality lubricant. Avoid oils that can attract dust.
- Apply Sparingly: A little goes a long way. Over-lubrication can cause issues.
- Disassemble Carefully: Take apart switches with care. Clean them thoroughly before applying lubricant.
Here’s a quick guide on lubricants:
| Type of Lubricant | Best For |
|---|---|
| Grease | Linear switches |
| Oil | Clicky switches |
| Dry Lubricants | Dusty environments |
Custom Modifications
Custom modifications can personalize your keyboard. They improve aesthetics and functionality.
- Switch Swaps: Change your switches for different feels. Test various types before settling.
- Keycap Replacement: Upgrade to unique keycaps. Choose materials and designs that suit your style.
- Sound Dampening: Add foam or silicone to reduce noise. This enhances the typing experience.
Popular modifications include:
- Switch lube
- Stabilizer mods
- Case foam installation
Experiment with these modifications. Find what works best for your typing style.
Frequently Asked Questions
How Often Should I Clean My Mechanical Keyboard?
You should clean your mechanical keyboard every 1 to 3 months. Regular cleaning prevents buildup of dust and debris. If you use it frequently, consider cleaning it more often. This ensures optimal performance and longevity of the keys.
What Tools Do I Need To Clean A Keyboard?
To clean a keyboard, you’ll need a few basic tools. Use a keycap puller, soft brush, and isopropyl alcohol. Microfiber cloths are also useful for wiping surfaces. These tools help you remove dirt without damaging the keyboard.
Can I Wash My Keycaps In Water?
Yes, you can wash keycaps in warm soapy water. Make sure to remove them first using a keycap puller. Rinse thoroughly and let them dry completely before reattaching. This method effectively removes grime without damaging the keycaps.
How Do I Remove Stubborn Stains From My Keyboard?
For stubborn stains, use a mixture of isopropyl alcohol and water. Apply it gently with a microfiber cloth. Avoid excessive moisture to prevent damage. This solution effectively cleans without harming the keyboard’s components.
Conclusion
Cleaning your mechanical keyboard regularly ensures optimal performance and longevity. A few simple steps can make a significant difference. By maintaining cleanliness, you enhance both your typing experience and the keyboard’s lifespan. Implement these cleaning techniques, and enjoy a fresh, responsive keyboard that feels like new.
Happy typing!


