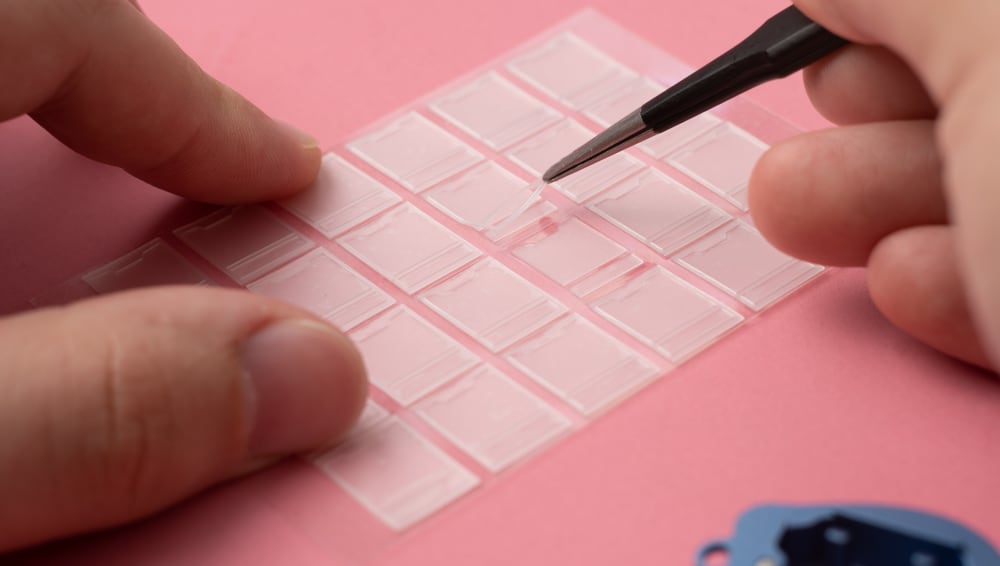
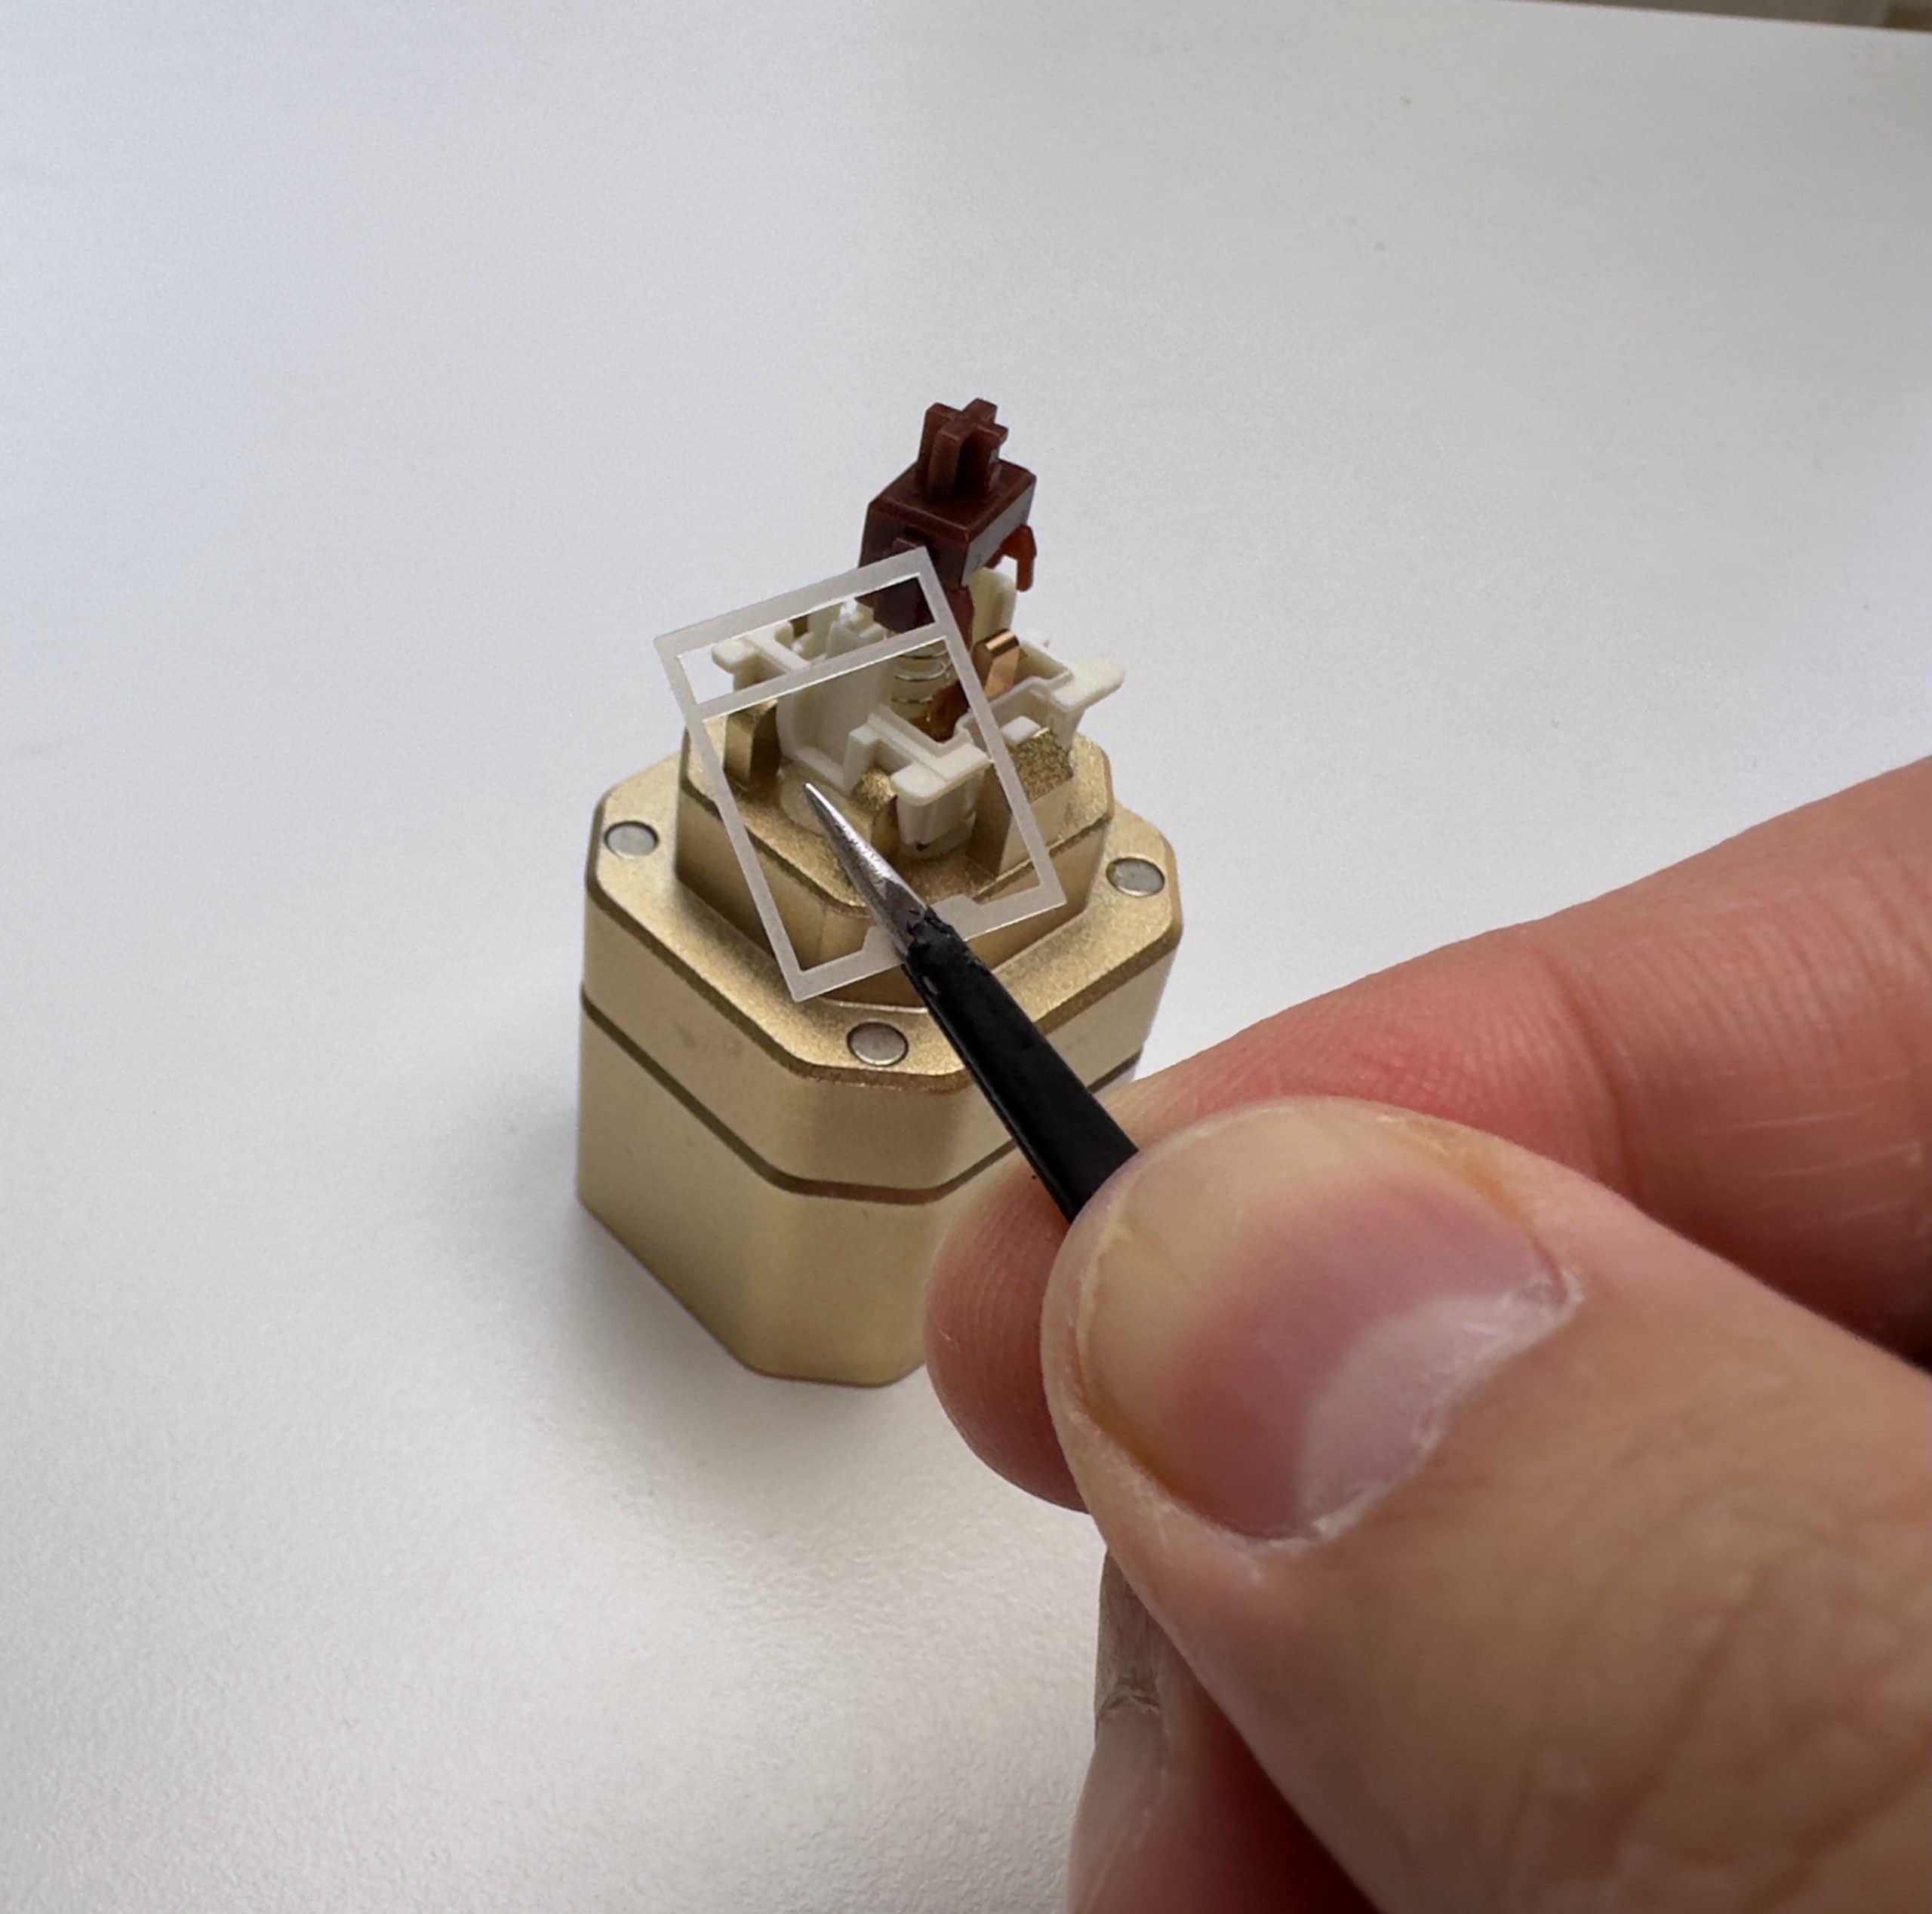
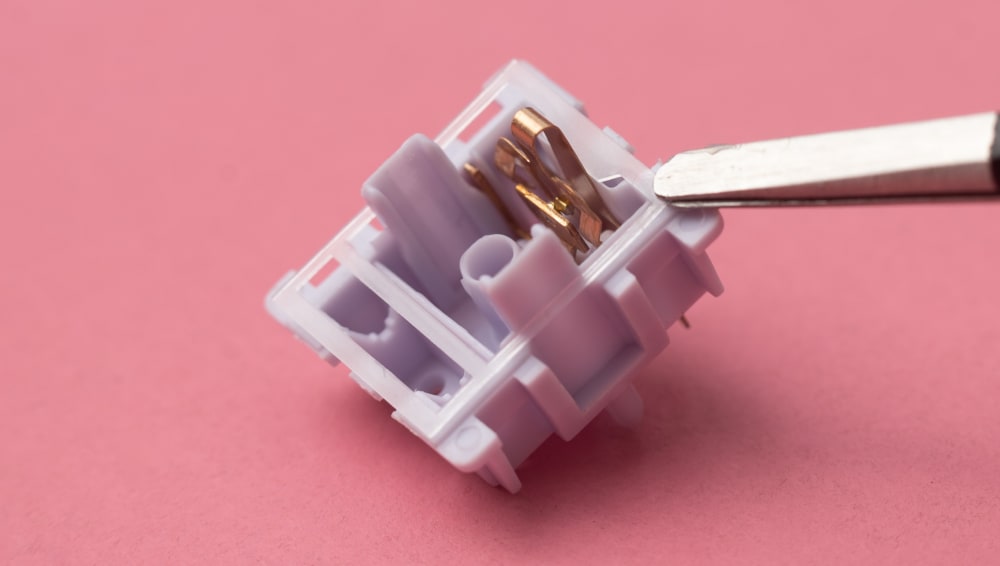
To film a switch on a mechanical keyboard, first remove the keycap and switch from the PCB. Then, apply the film around the switch housing before reassembling.
Filming a mechanical keyboard switch can enhance its sound and feel. Enthusiasts often seek to improve performance and reduce wobble. Switch films are thin materials placed between the switch components. This process is simple and can be done with basic tools.
Proper filming can lead to a more satisfying typing experience. Many users report improved acoustics and a tighter feel after filming. Whether you’re a seasoned modder or a beginner, this guide will help you film your switches effectively. Follow the steps carefully to achieve the best results and elevate your keyboard’s performance.
Mechanical keyboards have gained popularity among gamers and typists alike. They offer a unique typing experience. Each key has its own switch. This provides feedback and durability. Users enjoy the tactile feel and sound of each press.
The Rise Of Mechanical Keyboards
Mechanical keyboards surged in popularity for several reasons:
- Durability: They last longer than membrane keyboards.
- Customizability: Users can change switches and keycaps.
- Typing Experience: They offer a satisfying tactile feedback.
- Gaming Performance: Many gamers prefer the responsiveness.
Brands like Corsair, Razer, and Logitech lead the market. The community around mechanical keyboards is vibrant. Enthusiasts share builds, modifications, and tips.
Why Filming Switches Matters
Filming switches improves the overall keyboard experience. Here are some key benefits:
- Sound Dampening: Films reduce key noise.
- Tactile Feel: They enhance the switch’s feedback.
- Stability: Films minimize wobbling during typing.
Filming also protects the switches. It prevents dust and debris from entering. This ensures longevity and performance of your keyboard.
Many enthusiasts film their switches for a custom feel. The process is simple and rewarding. Enjoy a personalized typing experience with your mechanical keyboard.
Essential Tools And Materials

Choosing The Right Film
Choosing the correct film enhances switch performance and sound. Look for films made of silicone or TPU (thermoplastic polyurethane). These materials provide flexibility and durability. Here are some popular options:
- Silicone Films
- TPU Films
- Mylar Sheets
Check compatibility with your switch type. Films should fit snugly without damaging the switch.
Tools You’ll Need
Gather the following tools for filming your switches:
| Tool | Purpose |
|---|---|
| Switch Puller | To remove switches from the keyboard |
| Film Applicator | To place the film accurately |
| Tweezers | For precise handling of small films |
| Keycap Puller | To remove keycaps easily |
| Scissors or Cutter | To trim films to size |
Ensure all tools are clean and ready for use. This preparation helps achieve the best results.
Preparing Your Workspace
Setting up your workspace is vital for filming a switch on a mechanical keyboard. A clean and organized area helps you focus. It also reduces the risk of losing parts. Follow these steps to create a perfect filming environment.
Clean And Organized Area
Start by clearing your workspace. Remove any unnecessary items. A tidy area allows you to concentrate on your task. Here’s how to prepare:
- Clear your desk.
- Gather your tools:
- Filming tools
- Camera
- Lighting
- Mechanical keyboard
- Switches
- Set up your camera. Position it for a clear view.
- Ensure proper lighting for best results.
Safety First
Safety is crucial while filming. Follow these tips to avoid accidents:
| Safety Tip | Description |
|---|---|
| Wear Safety Glasses | Protect your eyes from small parts. |
| Use a Clean Surface | Avoid slips and falls. Keep the area dry. |
| Keep Tools Organized | Prevent injuries from misplaced tools. |
| Stay Focused | Minimize distractions to avoid accidents. |
Follow these safety guidelines. A safe workspace enhances your filming experience.
Disassembling The Keyboard
Disassembling your mechanical keyboard is the first step in replacing switches. This process requires careful handling to avoid damaging any components. Follow these steps to ensure a smooth experience.
Removing Keycaps
Keycaps sit on top of each switch. Removing them is simple:
- Use a keycap puller tool.
- Insert the tool under a keycap.
- Gently pull upwards.
- Repeat for all keycaps.
Keep keycaps in a safe place. Label them for easy reassembly.
Unscrewing The Plate
After removing the keycaps, you need to unscrew the keyboard plate.
Follow these steps:
- Turn the keyboard upside down.
- Locate all screws on the back.
- Use a screwdriver to remove each screw.
Store screws in a small container. This prevents loss.
Once unscrewed, gently lift the plate away from the keyboard base. Be careful not to damage any wires or components.
The Filming Process
 The filming process enhances your keyboard’s performance. It reduces wobble and improves sound. Follow these steps to film your mechanical switches effectively.
Separating The Switches
Start by removing the switches from your keyboard. Use a switch puller to avoid damage. Here’s how to do it:
- Turn off your keyboard and unplug it.
- Carefully insert the switch puller around the switch.
- Gently pull the switch out of the PCB.
Repeat this for each switch you want to film. Organize the switches for easy access later.
Applying The Film Correctly
Now that you have separated the switches, it’s time to apply the film. Follow these steps:
- Choose the right film. Use a thin and flexible material.
- Cut the film to fit the switch. Ensure it covers both sides.
- Place the film inside the switch housing.
Check that the film sits evenly. Make sure it does not interfere with the switch mechanism. Press the switch lightly to ensure proper placement.
Reassemble the switches back into the keyboard. Align them with the PCB and push down firmly.
Test each switch after filming. This ensures everything works correctly.
Reassembling The Keyboard
After replacing the switches, it’s time to reassemble your mechanical keyboard. Follow these steps carefully to ensure everything fits perfectly. A proper reassembly will keep your keyboard functioning well.
Placing Switches Back
Start by placing the switches back into their respective slots. Ensure the pins are aligned correctly. Here’s how to do it:
- Take each switch and align it with the slot.
- Gently press down until you hear a click.
- Double-check that each switch is secure.
Make sure no switches are loose. A loose switch can affect your typing experience.
Tightening The Plate
After placing all switches back, it’s time to tighten the plate. This step keeps everything in place. Follow these instructions:
- Locate the screws you removed earlier.
- Use a screwdriver to tighten each screw.
- Do this in a diagonal pattern for even tightening.
Check that the plate is firm. A loose plate can lead to key wobbling.
Once everything is secure, your keyboard is ready for use!
Testing And Troubleshooting

Initial Testing
Start with basic functionality checks. Follow these steps:
- Reconnect your keyboard to the computer.
- Open a text editor or any typing software.
- Type on all keys to see if they respond.
Pay attention to:
- Key responsiveness
- Sound of the switch
- Any sticking or unresponsive keys
Use a keyboard tester tool. This tool helps check each key’s functionality. Several online options are available. This can save you time.
Solving Common Issues
Some problems may occur during testing. Here are common issues and fixes:
| Issue | Solution |
|---|---|
| Key not registering | Check switch placement. Ensure it’s seated correctly. |
| Sticky key | Clean the switch. Use isopropyl alcohol. |
| Switch rattling | Inspect for loose parts. Tighten as needed. |
| Wrong switch feel | Verify you installed the correct switch type. |
Follow these steps to resolve most issues. If problems persist, seek help from keyboard forums. Enthusiasts often share valuable insights.
Enhancements And Customizations
Customizing your mechanical keyboard enhances both performance and aesthetics. Small tweaks can make a big difference. This section covers key enhancements like lubrication and custom keycaps.
Lubrication For Smoother Typing
Lubricating your switches can improve typing feel. It reduces friction and creates a smoother experience. Follow these steps:
- Disassemble your keyboard carefully.
- Remove the switches from the PCB.
- Open the switch casing gently.
- Apply a small amount of lubricant to the moving parts.
- Reassemble the switches and keyboard.
Choose the right lubricant for your switches. Here are some options:
| Type | Use | Effect |
|---|---|---|
| Grease | Linear switches | Smooth and quiet |
| Oil | Tactile switches | Enhanced feedback |
| Thin lubricant | Clicky switches | Maintains click sound |
Custom Keycaps For Aesthetics
Custom keycaps can change the look of your keyboard. They come in various colors and designs. Here’s how to choose the right ones:
- Consider the material: ABS or PBT.
- Check compatibility with your switches.
- Match your keycap profile to your typing style.
Popular keycap profiles include:
- SA: Sculpted and tall.
- DSA: Uniform height.
- Cherry: Low profile and comfortable.
Custom keycaps not only enhance looks but also improve feel. Explore different themes to express your personality.
Frequently Asked Questions
How Do I Film A Mechanical Keyboard Switch?
To film a mechanical keyboard switch, you need to disassemble it first. Carefully remove the switch from the keyboard. Then, place a film around the switch components. Reassemble the switch and put it back in the keyboard. This enhances sound and feel during typing.
What Tools Do I Need For Switch Filming?
You’ll need a few essential tools for switch filming. A keycap puller helps remove keycaps easily. A switch opener is crucial for disassembling the switches. Tweezers are handy for placing the films accurately. Finally, a small brush can help clean the switches before filming.
Can I Film Any Mechanical Switch?
Most mechanical switches can be filmed, but some may not benefit as much. Popular switches like Cherry MX and Gateron are ideal for filming. However, lighter or older switches may not require a film. Always test the switch before deciding to film it for optimal performance.
Will Filming Switches Change The Sound?
Yes, filming switches can change the sound profile. Adding a film reduces rattle and enhances the overall acoustics. This results in a deeper, more satisfying sound when typing. The difference is often noticeable, especially for those who value audio feedback in their typing experience.
Conclusion
Filming a switch on your mechanical keyboard can enhance your typing experience. Following these steps ensures you do it correctly and safely. With practice, you’ll master the technique and enjoy a more personalized keyboard feel. Keep experimenting with different switches to find the perfect fit for your needs.
Happy filming!


